NEW APPROACH
TERM/WEEK: THIRD TERM/WEEK 3
DATE: 18th July, 2020
CLASS: J S S 1
SUBJECT: Computer Science
TOPIC: The Desktop
Reference: The Internet
Brief explanation
A desktop may refer to any of the following:
- A desktop is a term commonly used to describe a desktop computer.
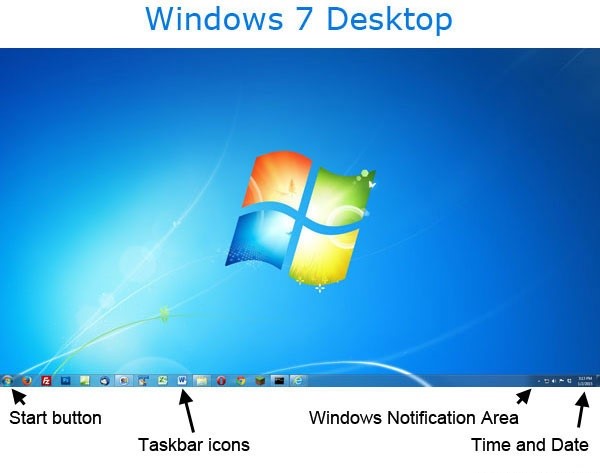
- When referring to an operating system or GUI (graphical user interface), the desktop is a system of organization of icons on a screen. The Microsoft Windows desktop was first introduced with Microsoft Windows 95 and included with every version of Windows since then. The image below is an example of the Microsoft Windows 7 desktop.
Notes for the Students
The desktop
The desktop is the main screen area that you see after you turn on your computer and log on to Windows. Like the top of an actual desk, it serves as a surface for your work. When you open programs or folders, they appear on the desktop. You can also put things on the desktop, such as files and folders, and arrange them however you want.
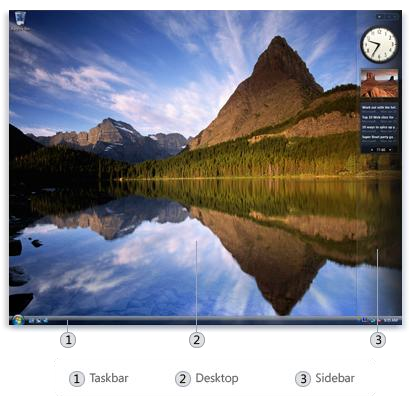
The desktop is sometimes defined more broadly to include the taskbar and Windows Sidebar. The taskbar sits at the bottom of your screen. It shows you which programs are running and allows you to switch between them. It also contains the Start button , which you can use to access programs, folders, and computer settings. On the side of the screen, the sidebar contains small programs called gadgets.
Where did my desktop go?
Because programs run on top of the desktop, the desktop itself is often partially or completely hidden. But it’s still there, underneath everything. To see the whole desktop without closing any of your open programs or windows, click the Show Desktop button on the taskbar. The desktop will be revealed. Click the icon again to restore all of your windows to the way they were.
Working with desktop icons
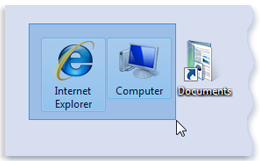
Icons are small pictures that represent files, folders, programs, and other items. When you first start Windows, you’ll see at least one icon on your desktop: The Recycle Bin. Your computer manufacturer might have added other icons to the desktop. Some examples of desktop icons are shown below.
Examples of desktop icons
Double-clicking a desktop icon starts or opens the item it represents. For example, double-clicking the Internet Explorer icon starts Internet Explorer.
Adding and removing icons from the desktop
You can choose which icons appear on the desktop—you can add or remove an icon at any time. Some people like a clean, uncluttered desktop with few or no icons. Others place dozens of icons on their desktop to give them quick access to frequently used programs, files, and folders.
If you want easy access from the desktop to your favourite files or programs, create shortcuts to them. A shortcut is an icon that represents a link to an item, rather than the item itself. When you double-click a shortcut, the item opens. If you delete a shortcut, only the shortcut is removed, not the original item. You can identify shortcuts by the arrow on their icon.
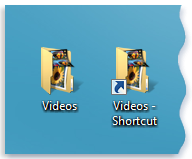
A folder icon (left) and a shortcut icon (right)
To add a shortcut to the desktop
- Locate the item that you want to create a shortcut for (within Windows Explorer, or your Computer folder, for example).
- Right-click the item, click Send To, and then click Desktop (create shortcut). The shortcut icon appears on your desktop.
To add or remove common desktop icons
Common desktop icons include Computer, your personal folder, Network, the Recycle Bin, Internet Explorer, and Control Panel.
- Right-click an empty area of the desktop, and then click Personalize.
- In the left pane, click Change desktop icons.
- Under Desktop icons, select the check box for each icon that you want to add to the desktop, or clear the check box for each icon that you want to remove from the desktop, and then click OK.
To move a file from a folder to the desktop
- Open the folder that contains the file.
- Drag the file to the desktop.
To remove an icon from the desktop
Right-click the icon, and then click Delete. If the icon is a shortcut, only the shortcut is removed; the original item is not deleted.
Moving icons around
Windows stacks icons in columns on the left side of the desktop. But you’re not stuck with that arrangement. You can move an icon by dragging it to a new place on the desktop.
You can also have Windows automatically arrange your icons. Right-click an empty area of the desktop, click View, and then click Auto Arrange. Windows stacks your icons in the upper-left corner and locks them in place. To unlock the icons so that you can move them again, click Auto Arrange again, clearing the check mark next to it.
Note: By default, Windows spaces icons evenly on an invisible grid. To place icons closer together or with more precision, turn off the grid. Right-click an empty area of the desktop, click View, and then click Align to Grid to clear the check mark. Repeat these steps to turn the grid back on.
Selecting multiple icons
To move or delete a bunch of icons at once, you must first select all of them. Click an empty area of the desktop and drag the mouse. Surround the icons that you want to select with the rectangle that appears. Then release the mouse button. Now you can drag the icons as a group or delete them.
Select multiple desktop icons by dragging a rectangle around them
Hiding desktop icons
If you want to temporarily hide all of your desktop icons without actually removing them, right-click an empty part of the desktop, click View, and then click Show Desktop Icons to clear the check mark from that option. Now no icons are displayed on the desktop. You can get them back by clicking Show Desktop Icons again.
The Recycle Bin
When you delete a file or folder, it doesn’t actually get deleted right away—it goes to the Recycle Bin. That’s a good thing, because if you ever change your mind and decide you need a deleted file, you can get it back.

The Recycle Bin when empty (left) and full (right)
If you’re sure that you won’t need the deleted items again, you can empty the Recycle Bin. Doing that will permanently delete the items and reclaim any disk space they were using.
Picking a desktop background
One of the easiest ways to personalize your computer is to change the desktop background, also called the wallpaper. You can choose one of the backgrounds provided with Windows, pick a favourite digital picture from your own collection, or use a solid background colour. You can also find pictures on the Internet designed to be used as desktop backgrounds.

Sample desktop backgrounds provided with Windows
To change the desktop background
- Right-click on your desktop and choose Personalize.
- Click the Desktop Background link.
- Click the picture or colour you want for your desktop background.
If the picture you want to use is not on the list of desktop background pictures, click Browse to search for the picture on your computer. When you find the picture you want, double-click it. It will become your desktop background and appear in the list of desktop backgrounds.
- Under How should the picture be positioned, choose to have the picture fit the screen, tile, or be cantered on the screen, and then click OK.
Note: If you choose to have a cantered picture as your desktop background, you can also have a colour background to frame your picture. Under How should the picture be positioned, click Change background colour, click a colour, and then click OK.
Tip
You can make any picture on your computer your desktop background by right-clicking the picture, and then clicking Set as Desktop Background.
To change the theme to windows classic
- Right-click on your desktop and choose Personalize.
- Under Theme, select the Windows Classic theme in the drop-down list, and then click OK.
Exercises/Assignment
- List 6 icons on the desktop.
- What is desktop?